Complete Form I-9 and E-Verify for new hires
All U.S. employers need to verify that new hires are legally authorized to work in the United States by completing Form I-9 and, in some cases, using E-Verify.
How Gusto helps
We help you create, fill out, upload, and store the I-9 during onboarding. You and your employee fill out the I-9 together, and you keep it in your records. We do not file Form I-9 with the government.
Form I-9
Use Form I-9 to prove that each person you hire can work in the United States. You need to complete this form by the employee's start date.
E-Verify
If an employee is in a state that requires E-Verify (for some or all employers), you’ll need to complete it. These states require e-Verify enrollment (as of November 24, 2025):
Alabama, Arizona, Colorado*, Florida, Georgia, Idaho*, Indiana*, Louisiana, Michigan*, Minnesota*, Mississippi, Missouri*, Nebraska*, North Carolina, Oklahoma*, Pennsylvania*, South Carolina, Tennessee, Texas*, Utah, Virginia*, and West Virginia*. *e-Verify is only required for public contractors and employees of government agencies.
Always check your state’s latest e-Verify rules. Learn more below.
Form I-9 (Employment Eligibility Verification) proves that a new hire is allowed to work in the United States.
Create an I-9 for a new hire
Admins can create Form I-9s for employees who are self-onboarded or employer-onboarded (with any start date—past, present, or future).
To create someone's I-9 when adding them as a new hire through self-onboarding:
In Gusto, set up self-onboarding for the employee.
If you send an offer letter: After the new employee accepts it, they have the opportunity to fill out the I-9 after they onboard.
Click the checkbox next to Form I-9.
During self-onboarding, the new employee will enter their own personal details and sign documents, including Form I-9.
To create someone's I-9 when you add them to Gusto as a new hire through employer-led onboarding:
Step 7 of onboarding is the Documents section. This lists the standard onboarding documents we'll send the employee, including the I-9. You can add or remove documents using the checkboxes.
Once employer-led onboarding is complete, the employee receives a dashboard notification to complete the onboarding forms, including the I-9 if you selected it.
Complete the employer portion of Form I-9
The law says you need to verify the employee’s identity and work eligibility by their start date. After the employee finishes self-onboarding, or an employer-onboarded employee fills out their portion of the I-9, you’ll get email and homepage reminders to complete your part of Form I-9.
To complete Form I-9:
On the employee's start date, sign in to your Gusto admin account.
Click the Complete Employee I-9 sticky note.
You can also get here by going to the employee's onboarding checklist.
Review your new employee’s proof of identification documents that they have physically given to you.
For more info on the required documents, read the Eligibility document requirements section of this article.
Select which identification and work authorization documents you reviewed.
Click Save & Continue.
Enter the information from the identification and work authorization documents.
Click Save & Continue.
Enter your full name and your title at the company. Select I agree to electronically sign this form.
If you chose not to send the I-9 form when an employee was onboarded, you'll get a dashboard notification and an onboarding checklist task to upload the completed form.
Download a blank copy of the Form I-9
If you need a copy of Form I-9 to send to your employee to fill out:
On your dashboard, find the Complete [employee name]'s I-9 sticky note. Click the three dots icon.
You can also get here by going to the employee's onboarding checklist and finding the task called Complete [employee name]'s I-9.
Click Download form.
Once the employee completes the form and returns it to you, you can upload it to Gusto.
Upload a completed I-9 to Gusto
To add a completed I-9 to an employee's profile:
On your dashboard, click the Complete Employee I-9 sticky note.
You can also get here by going to the employee's onboarding checklist and finding the task called Complete [employee name]'s I-9.
Click Upload.
Select +Upload to attach a document.
Click the checkbox to verify that the file uploaded is an accurate copy of the original documents presented by the employee.
Click Save.
This saves the form to the Documents section of the employee’s profile and marks the task as done.
Mark the I-9 task as done without uploading the document
If you need to mark someone's I-9 task as done without uploading anything to Gusto, follow these steps:
Click People.
Choose Onboarding.
Find the name of the employee and click View checklist.
Find the task called Complete [employee name]'s I-9 and click the three dots icon.
Click Mark as done.
If you need to edit the I-9, you’ll have to do it outside of Gusto. Once done, upload the corrected version to your employee's profile. Check out the USCIS website for best practices when correcting an I-9.
If you hire a remote employee, you need to complete Form I-9 with them by their start date. The form verifies their identity and eligibility to work in the U.S.
Employers need to check the employee's identification and eligibility documents. Expand the section below that fits how you want to handle it.
You need to check your employee's identification and eligibility documents. You have two ways to do this yourself:
Work with your remote new hire to do an in-person inspection of their documents.
If your company uses E-Verify, you can check their Form I-9 documents remotely.
You can learn how to enroll in E-Verify and find more information on remote document checks and keeping records on the Remote Examination page.
The USCIS also offers an alternate method for examining documents.
Important: You need to complete Section 2 within 3 business days of the employee’s start date. If you’re late, Immigration and Customs Enforcement (ICE) could fine you.
To fill out the form with a remote employee, follow these steps.
Check the full rules for getting, checking, and keeping copies of employee documents on the ICE website.
Have your employee fill out Section 1 of the I-9 by their start date.
We'll create the form and make it available in their account if you make that selection during onboarding.
Within 3 days of the employee's start date, you or an authorized representative need to check the employee's ID and work documents and fill out Section 2.
What to look for: An ID document is okay if it shows who the employee is, looks real, and is not expired.
Authorized representative: Anyone you authorize to complete and sign Section 2 on the company's behalf.
Get line-by-line guidance for completing Section 2 from ICE.
Double-check that every field is filled out and that the information is correct, then sign the form.
Store copies of eligibility documents and the signed I-9 form for three years after the date of hire, or one year after the employee's termination — whichever is later.
If you chose not to send the form to the employee through Gusto: their onboarding checklist will include an option to upload the form to their profile.
You can store the documents in Gusto. Check out our articles with steps for admins and steps for employees.
Gusto's remote verification tool automates the Section 2 review for a remote employee. Instead of you arranging an authorized representative yourself, your employee selects their own reviewer directly in Gusto.
Note: Remote verification is available on Premium plans at no extra cost. On other plans, each verification costs $20 and appears on your invoice.
Select remote verification during onboarding
You indicate your I-9 verification method when you get to the Set up Gusto features task of the new hire's onboarding checklist.
After you send the invitation, you cannot change the verification method.
To use Gusto's remote verification tool:
Go to the new hire's onboarding checklist.
Find the Set up Gusto features task and click Start.
Scroll to Employment eligibility (Form I-9).
If you've used remote verification at this location before, it's selected by default.
Select Edit to change it — this also updates the default for future hires at that location.
If this is your first hire at this location, choose from three options: On-site/in-person, Remote Verification, or I'll handle employee eligibility on my own. Select Remote Verification. Review the pricing and click Save and continue.
Important: You need to use a consistent I-9 verification method for each work location. This is why we default to remote verification once you've used it at a location. All remote locations in a state count as one location, but each physical office is treated separately.
Select any other Gusto features you want to set up for this employee, then click Save and continue.
The employee will receive an email letting them know to access Gusto and complete their onboarding. Once your employee completes their part of the I-9, the onboarding checklist item is marked as done. You do not need to do anything else.
Steps for employees
Once an admin selects remote verification for a new hire, the employee follows the steps below to complete their part.
Step 1: Fill out I-9 documentation
To fill out the I-9:
Go to the I-9 section of your onboarding. Review and agree to the conditions, then select Start. Your personal information from onboarding is pre-filled.
Select your citizenship status and choose your identity document type (for example, a U.S. passport). Enter the document's expiration date and document number.
Upload clear photos of your document. After you attach the image and fill out all document details, select Next.
Indicate whether a preparer or translator helped you complete the form, then select Next.
Provide your signature. Select Finish to submit your I-9 information.
Step 2: Complete the in-person review
After you submit the form, a designated reviewer needs to review your work authorization documents in person.
The reviewer can be a family member or anyone who meets these requirements:
Is 18 or older
Is physically present with you
Has a mobile device with internet access and a web browser
To complete the in-person review:
When prompted, allow location sharing. This confirms that you and your reviewer are in the same place.
Enter your reviewer's mobile phone number and select Send text message. They'll get a text with a link to start the review.
Note: International phone numbers are not supported.
Have your reviewer scan the QR code from the text message to access the review portal.
Your reviewer accesses your uploaded documents through the portal, confirms the information, certifies their identity, and attests to the accuracy of the review.
After your reviewer finishes, the verification is complete. You and your employer do not need to do anything else.
If you complete Form I-9 more than three business days after the start date, fill out the form as soon as you can and write down why it was delayed. If U.S. Immigration and Customs Enforcement (ICE) checks your records, they might fine you, and the fines could get bigger with each mistake. It's important to finish these forms quickly and fix any delays right away.
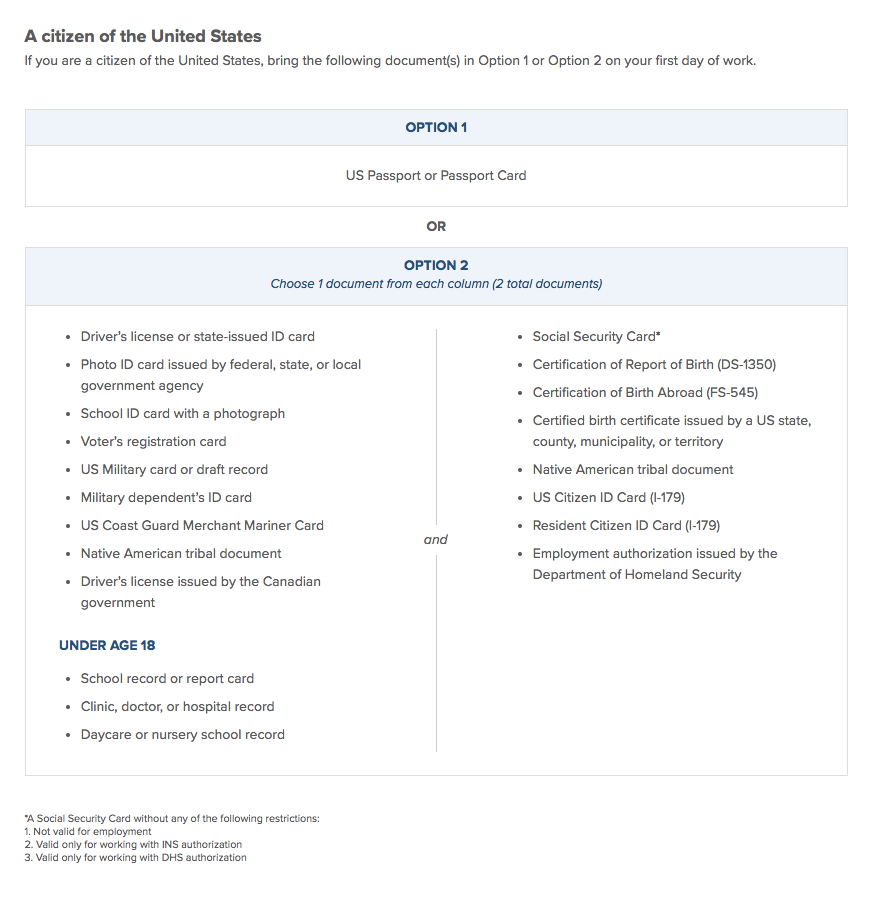
The type of documentation you need to prove employment eligibility depends on the employee's status in the United States. Documents need to be current and not expired.
For more info on these requirements, check out the official I-9 form on the government website.
A citizen is someone who was born in the United States or is a naturalized citizen living in the United States.
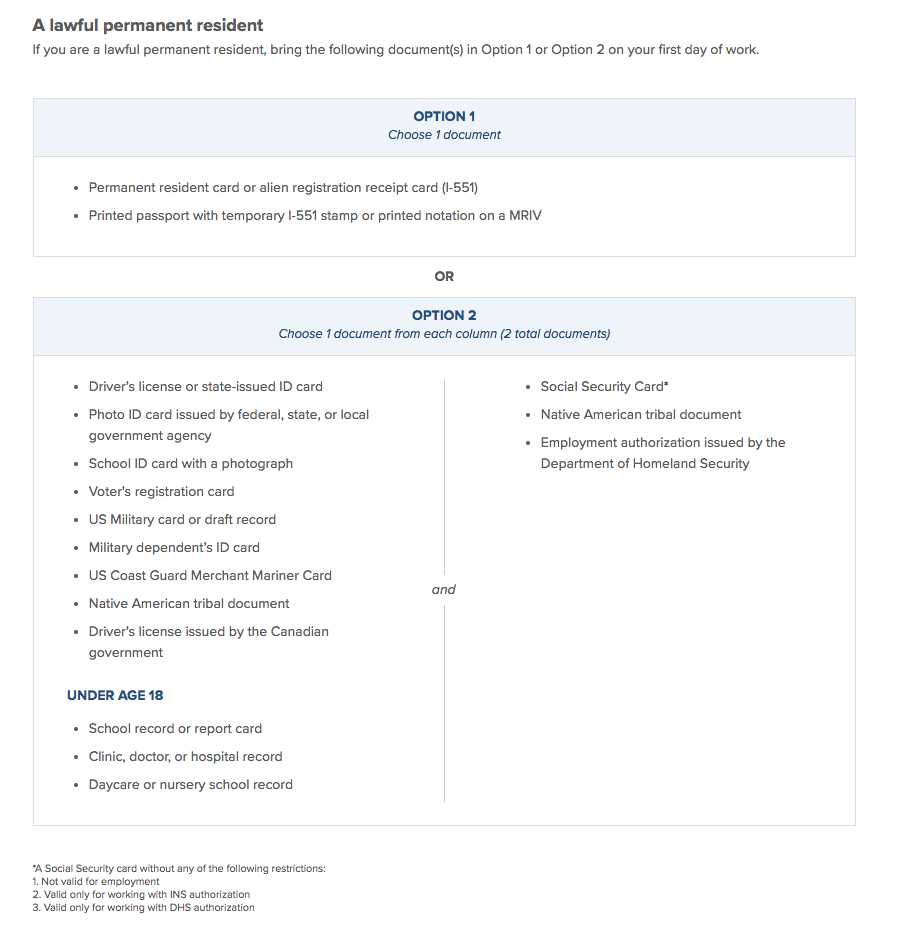
A lawful permanent resident is someone who is not a United States citizen and who resides under legally recognized and lawfully recorded permanent residence as an immigrant.
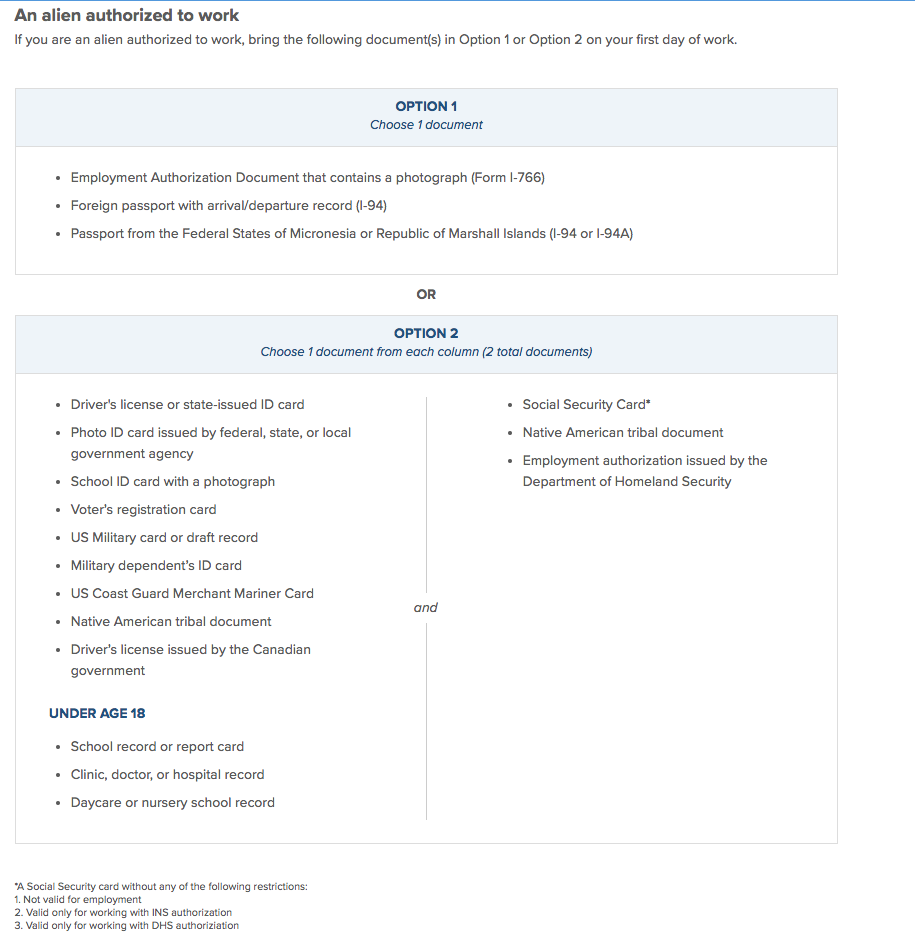
This includes anyone authorized to work in the United States but is not a United States citizen, United States national, or lawful permanent resident.
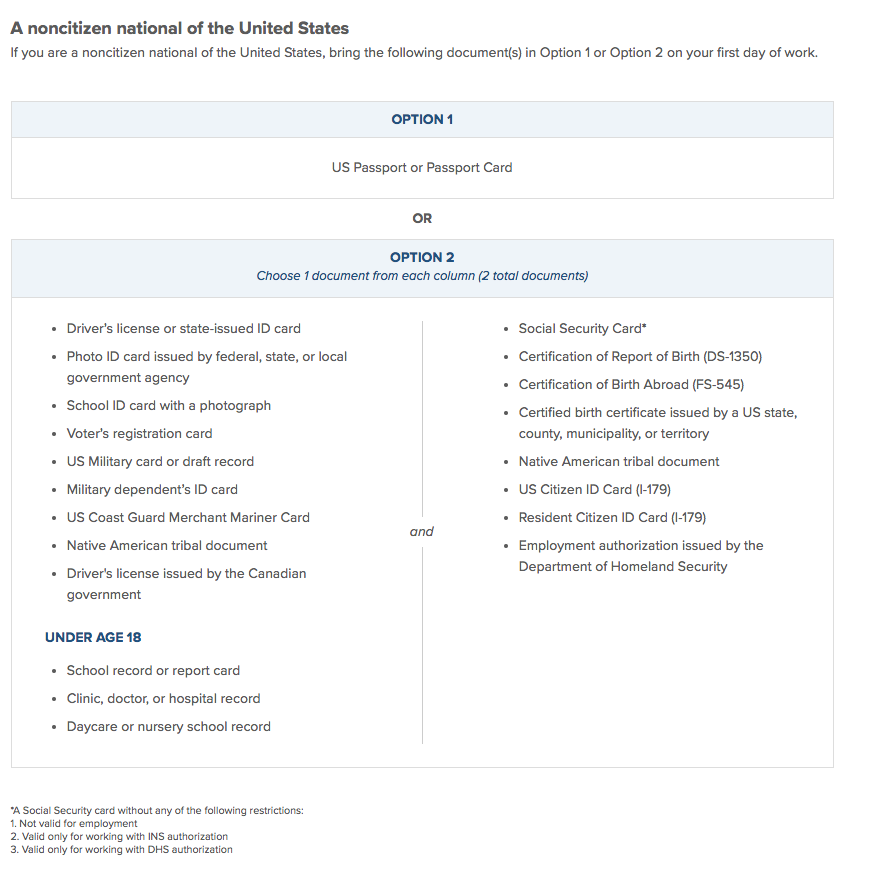
A noncitizen national is someone born in American Samoa, certain former citizens of the former Trust Territory of the Pacific Islands, and certain children of noncitizen nationals born abroad.
If a document does not appear genuine or does not seem to relate to the employee presenting it, you have a few options:
Request different documentation. Allow the employee to present other acceptable documents from List A, or a combination of List B and List C. You cannot require them to provide a specific document — the employee chooses what to present.
Accept a receipt temporarily. If the original document was lost, stolen, or damaged, an employee may present a receipt for a replacement document. They must provide the actual replacement document within 90 days.
Designate an authorized representative. You can assign a personnel officer, agent, or notary public to examine documents and complete Section 2 on your behalf. You remain liable for any violations.
Use E-Verify. If your organization is enrolled in E-Verify, you can verify employment eligibility electronically against government databases. E-Verify participants may also use the DHS-authorized alternative procedure to examine documents remotely.
If the employee still can't provide acceptable documents, do not complete Section 2 and do not begin or continue employment. Knowingly hiring or retaining unauthorized workers can result in civil fines and criminal prosecution.
E-Verify is a free online system. It checks if new employees can legally work in the United States.
E-Verify is free to use and it takes only minutes to enroll. It's available 24 hours a day and gives instant results.
Who needs to use E-Verify
Federal contractors must use E-Verify for all employees.
21 states require E-Verify for some or all private employers: Alabama, Arizona, Florida, Georgia, Idaho, Indiana, Louisiana, Michigan, Minnesota, Mississippi, Missouri, Nebraska, North Carolina, Oklahoma, Pennsylvania, South Carolina, Tennessee, Texas, Utah, Virginia, and West Virginia.
Learn more about E-Verify
Main website: www.E-Verify.gov
Program information
User manuals
Employee rights information
"E-Verify Overview" (1 hour) - Complete program training
"E-Verify in 30" (30 minutes) - Quick overview
FAQs
Q: Can I save my enrollment progress?
A: No. You must complete enrollment in one session.
Q: How long does enrollment take?
A: Most companies receive confirmation within minutes.
Q: Do I need special software?
A: No. You only need a web browser and internet access.
Q: What if my company is already enrolled?
A: Check the employer search tool at E-Verify.gov first.
Important: You must complete enrollment in one session. You cannot save your progress.
Step 1: Gather required information
You'll need the following info to enroll:
Company legal name
Federal Tax ID Number
Company address
Number of current employees
NAICS code (industry code)
Program Administrator contact info
Signatory contact info
Step 2: Enroll
To enroll on the E-Verify website:
On the Use Agreement page, click I Agree to consent to the terms.
Enter your email address.
Go to your email inbox and click the activation link.
Choose your account type.
Enter company information.
Add hiring site locations.
Add a program administrator and signatory.
Review and submit.
You will receive: Email confirmation within minutes.
Step 3: After enrolling
Two more steps are required after you enroll:
Your company's program administrator needs to complete E-Verify's online training.
Display E-Verify posters at your workplace.
E-Verify customer and technical support
Contact E-Verify for questions about E-Verify policies, Form I-9, and employment eligibility.
Phone: 1-888-464-4218
Email: [email protected]
Hours: Monday-Friday, 8 AM to 8 PM Eastern Time
Note: Contact information is subject to change. Always verify current contact details at E-Verify.gov.
Once you complete Form I-9, you can view it in an employee’s profile. You can also download all the I-9s Gusto has on file for your entire team.
View a specific employee’s I-9
To find a certain employee's I-9:
Go to People.
Click your employee's name.
Click Documents.
View the Form I-9.
Employees can also access and download this form at any time by going to the Documents tab in their own account.
Download a package of all Form I-9s in Gusto
To download all the I-9s Gusto has on file for your entire team:
Go to Documents.
Click Bulk downloads.
You can only generate a package once per day. Depending on the file size, your .zip file could take a while to create.
On the I-9 row, click Generate.
Wait for the W-4 package to generate.
If you download a package while the new package is still generating, you'll download the old file.
Once generated, click Download.
Pro Tip: If your company has a large number of employees, check back in about 5 minutes to see if your .zip file is ready for download.