Broker integration: Connect existing insurance plans to Gusto
This article is for admins who want to connect their existing health insurance plans with Gusto through their current broker, and for brokers who need to upload plan information or complete open enrollment in Gusto.
If you offer health insurance, you can add your broker to Gusto and integrate your existing plans with Gusto’s payroll and HR platform. Your broker gets access to your team’s group insurance plans so they can check on them and make changes. Your team can enroll themselves, view plan details, and update information right in Gusto. This saves you and your broker time.
Broker integration features
Keep your current broker and rates. Relationships matter. With Gusto, you can work with your current benefits broker and keep your current rates.
Keep your existing coverage. Keep your existing benefits plans and networks so your employees continue to get the coverage they know and trust.
Automate benefits calculations. We automatically calculate benefits when you run payroll. Plus, we identify eligible employees and notify them to enroll in benefits.
Give employees self-service access. Your team can access their paystubs, benefits information, W-2s, and more from Gusto.
Pricing and availability depend on which Gusto plan you have:
Simple: Not available on Simple. Upgrade to Plus to use the broker integration.
Plus: $6 per eligible employee per month. This fee applies only to businesses that integrate with external brokers. There’s no extra cost to using Gusto as your broker.
Premium: No extra cost to your Premium monthly plan pricing
Add-ons
When our team sets up your broker integration, let us know if you want any of these features.
ACA filing
Cost: $1,250 per year
We prepare and file Forms 1094-C and 1095-C in compliance with the Affordable Care Act (ACA).
COBRA administration
Cost: $30 per company per month
If your company must offer federal COBRA, we can help you handle compliant COBRA administration.
Tax-advantaged accounts
Cost: One $200 annual service charge covers all three account types, plus:
Health Savings Account (HSA): +$2.50 per participant per month, no minimum
Flexible savings account (FSA): +$4 per participant per month, $20 per month minimum. You can also offer a dependent care FSA (DCFSA) with no extra fee.
Commuter benefits: +$4 per participant per month, $20 per month minimum
We notify eligible employees to enroll. They get a debit card to fund with pre-tax dollars. They can spend these funds on qualified expenses.
We also recommend the broker integration for customers who currently offer health insurance through Gusto and are approaching the small-group coverage size limits. By adding your new large-group broker to Gusto, your team can access large-group plans without losing your benefits administration. You’ll keep the same automated payroll deductions, tax reporting, new hire onboarding, and more.
When to start looking for large group health insurance
Some carriers will let you continue small-group coverage for a year after you meet the large-group minimum. But you may find better rates and plans on the large group market.
Depending on the state where you get your company’s health insurance, here’s when it’s time to start thinking about large group health insurance with a new broker:
California, Colorado, New York, or Vermont: When you reach 100 employees
Any other state: When you reach 50 employees
The way employees are counted varies by state. Some states use the average number of employees you had in the last year. Others count all hours worked to get the number of full-time equivalent employees. A large group broker can help you figure out if and when your company can get large group plans.
If you’re near the small group limit when your benefits are up for renewal, our licensed advisors will explain your options. They’ll refer you to a large group broker if you need one.
Ready to bring your broker and benefits together in one place? Setting up the broker integration with Gusto is the first step towards simpler benefits management.
To request the broker integration:
Go to Benefits.
Under Integrate your existing benefits on Gusto, click See your options.
If you cannot find this banner, scroll to the Health section.
Next to Medical, Dental & Vision, click Set up.
Choose I already have benefits.
If you’re on the Simple plan, upgrade to Plus to access the broker integration.
Under Bring your broker to Gusto, click Get more info.
Contact us if you do not find this option. To contact us, sign in to your Gusto account and click the help icon
 in the top-right corner of the page.
Click Get started.
If you have more questions, click Talk to our team instead to connect to a benefits specialist.
Select which lines of coverage you want to integrate. This includes medical, dental, vision, life, short-term and long-term disability, and tax-advantaged accounts.
Select the month and day your company’s medical benefits renew. If you’re not sure, check your policy documents or ask your broker. No matter when your benefits renew, you can keep setting up the integration. We’ll reach out to discuss the timeline.
If your renewal is less than 45 days away: We recommend running your upcoming open enrollment outside of Gusto. Meanwhile, we’ll integrate your upcoming renewal plans with Gusto. We’ll reach out to discuss the timeline with you once you complete these setup steps.
If your renewal is 45–90 days from today: We recommend integrating your renewal policies and running open enrollment through Gusto.
If your renewal is more than 90 days from today: We’ll integrate your current policies. When it’s time for your renewal, we’ll work with your broker to run open enrollment through Gusto.
Click Save and continue.
Tell us about your broker. Enter their name, agency name, and email.
If your company has ever had Gusto as your broker, we’ll also ask when your new broker took over.
Click Save and continue. This sends your broker an invitation to join your company on Gusto. They’ll have access to your company’s benefits and reports. This way, they can manage your team’s benefits.
Click Sign form to review and sign each document.
Click Send forms.
Review your benefits and broker info. If everything looks correct, click Send broker integration order. You can review a timeline of your integration on the next page.
Note: If the broker integration is an add-on to your Gusto plan, billing will begin after we set up your benefits in Gusto.
Once you complete the steps above, a dedicated benefits specialist will reach out to start your onboarding. Click here for an outline of the setup process.
You can let your broker know that we’ll email them a link to start adding your company’s plans to Gusto. We’ll also request some plan documents from them via email.
Once we start setting up your benefits in Gusto, your primary admin will get an email to approve the invitation to add your broker to your Gusto account. Once approved, follow the steps below and grant your broker admin permissions in Gusto.
Add your broker as a new Gusto admin
If your broker needs admin access in Gusto, your company’s primary admin must grant them access first.
Then, follow these steps to add them as a new Gusto admin:
Go to People.
Next to Add person, click the dropdown arrow.
Choose Add collaborator.
Add your broker’s information (first name, last name, email).
If you want, add a personal note. This note will be included in the broker’s welcome email.
Under Relationship to your organization, select Broker.
Select what they will help you with.
Check the default broker permissions. You can review or edit what a broker can access. By default, brokers can:
View basic information,
View pay and work,
And have full access to all benefits
Click Save collaborator.
Once your broker sets up their account, they can manage your company’s benefits. They can also set up employee deductions and view payroll reports and tax filings.
Add broker permissions to an existing admin
If your broker is already an admin for your company, you need to remove them from the admin role. Then, re-add them as a broker. Follow the steps above under “Add your broker as a new Gusto admin.”
Change your broker in Gusto
If your broker integration is active in Gusto and you change brokers, email [email protected] with the new broker’s name, contact info, and effective date of the change.
We’ll reach out with more instructions. Be prepared to:
Complete a new broker intake form (we’ll provide this).
Add your new broker to Gusto as an admin.
Remove your previous broker from Gusto.
Work with your previous broker and new broker to assign any open member-level event tasks.
When it’s time for you to add the company’s insurance plans to Gusto, we’ll email you a link to get started.
Make sure you have the company’s plan documents for reference. This includes Summaries of Benefits and Coverage (SBCs), rate sheets, and invoices.
To upload plan and policy info:
If the company’s admin has not granted you access yet, refer them to the Add your broker as an admin section of the article.
Find the welcome email we sent you with the subject line “[Action Required] Provide benefits information for [company name’s] broker integration.” Click the link in the email to go to the plan upload page in Gusto.
Under Medical, click Add medical policy.
If the company offers more than one medical plan, you’ll add each policy separately.
Fill out the policy’s info.
Click Save and continue.
Next, fill out the plan’s coverage info.
Click Save and continue.
Let us know how the company contribution is set up for this plan.
Click Save and continue.
Upload the company’s plan documents.
Click Save policy.
Repeat for each plan and line of coverage that the company wants to integrate with Gusto.
Review each plan and line of coverage to make sure you’ve added them correctly.
If you need to make changes, find the plan name and click Edit policy.
Scroll to the bottom and click Mark complete.
Once you mark this task as complete, we’ll review the plan info. Then we’ll email the company admin and broker with the next steps.
As the broker, make sure you’ve also emailed these documents to your benefits specialist:
Broker integration intake form
Tax-advantaged account intake form (if applicable)
Current employee census with all benefits enrollment information
If your company uses broker integration, you can choose optional settings for:
COBRA administration
ACA filing
API automation
Access your broker integration settings
To access your broker integration settings:
Go to Benefits.
Click into any integrated line of health benefits, like your medical or dental coverage.
Near the top, click Settings.
Expand the sections to learn about each setting. You’ll learn what their statuses mean and what to expect with pricing or setup.
Click here to learn about administering federal COBRA continuation coverage.
Who can change the COBRA administration setting: Primary payroll admins and full access admins.
Cost: $30 per company, per month.
What your COBRA status means
Active: Your company is set up with Gusto’s third-party COBRA administrator.
Inactive: You’re either not required to offer COBRA or managing it outside Gusto.
Change your COBRA administration setting
When you opt in or out of COBRA administration, the change usually takes effect on the 1st of the following month. It can take up to 30 days to process. The status in Gusto will update to active or inactive on the effective date, which is usually the first of the following month.
To update your COBRA administration:
Go to Benefits.
On any integrated line of health benefits, click Manage.
Near the top of the page, click Settings.
In the Federal COBRA administration tile, click View details.
On the right, select Change subscription.
If you’re opting in, watch for an email with the next steps to finalize your subscription. Your COBRA subscription will not activate until you complete these steps.
Get more help
To cancel a pending change, email [email protected].
For help with an active COBRA subscription, email [email protected].
Who can manage the ACA filing setting: Primary payroll admins and full access admins
Cost: $1,250 per year
What your ACA filing status means
Active: We’ll prepare and file IRS Forms 1094-C and 1095-C for you.
Inactive: You’re either managing ACA filing outside Gusto, or you’re not required to file.
Change your ACA filing setting
To opt in or out of ACA filing:
Go to Benefits.
On any integrated line of health benefits, click Manage.
Near the top, click Settings.
In the Affordable Care Act (ACA) filing tile, click View details.
On the right, select Change filing option.
Your status applies to the current calendar year. We file in Q1 of the next year. To file for the year, opt in by December 31.
Currently available with Guardian and Principal, the API automation sends these member-level updates in real time:
New hire enrollments
Employee terminations
Individual updates (like name or address changes)
Who can manage this: Any admin with the Manage all Benefits permission
Opt in or out of API automation
To check if automation is available and turn it on:
Go to Benefits.
On any integrated line of health benefits, click Manage.
Near the top, click Settings.
Under Automation, find the carrier you want to automate, and then click Turn on automation.
Automation will typically begin within a week. Brokers should continue to manually process pending tasks as usual. Once the automation is active, automatically processed tasks will start appearing under the Completed tasks tab, with the note “Completed by carrier automation.”
To cancel automation, email [email protected].
When you use broker integration, we automatically handle benefits notifications for employee life events. We notify your broker when they need to take action. This saves you time and makes sure nothing gets missed.
New hires
We automatically notify eligible new hires to view and choose coverage in Gusto. Then we notify your broker to process their enrollment.
Benefit changes
Employees who experience a qualifying life event can request a benefit change in Gusto. Your broker will get a notification to process their change with the carriers.
Dismissals
If the employee was enrolled in benefits, your broker will get a notification to process their coverage termination. If your integration includes the COBRA add-on, the employee will get a notice of continuation and an enrollment packet. Learn more about continuation administration.
Other plan administration
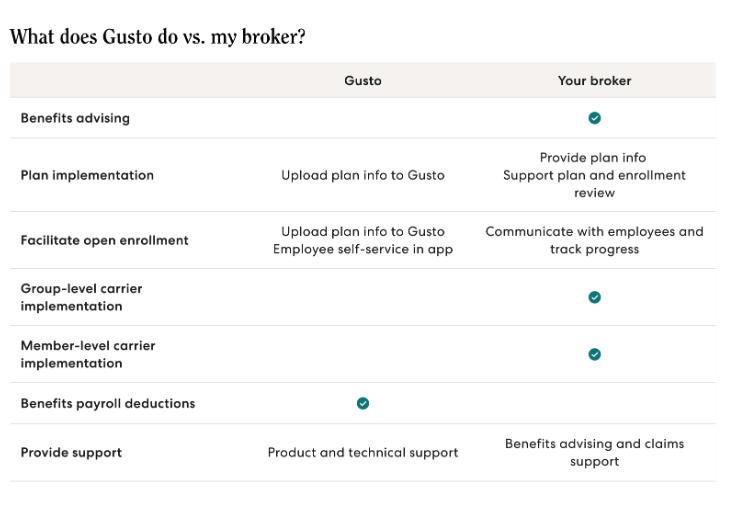
If you have questions about your benefits, contact your broker directly. They’ll answer any questions about coverage, claims, and more. The table outlines which tasks your broker will complete themselves. It also shows when they’ll partner with Gusto to make updates.
Voluntary life and disability plans have a Guaranteed Issue (GI) limit. If an employee picks a benefit amount above the limit, the carrier requires Evidence of Insurability (EOI). EOI is a health questionnaire. The carrier uses it to assess risk before approving the full amount. You'll see a task on your dashboard reminding you to update an employee's EOI status after the carrier makes a decision. Click here to learn how to update someone's EOI status.
When coverage renews, we’ll work with the broker to update plans in Gusto. Employees will get an email when it’s time to complete open enrollment in Gusto.
Since the video below illustrates the open enrollment process for admins, brokers, and employees, it may be beneficial to share this video with employees. They can skip to the 3-minute mark of the video for their enrollment demo.
Your Gusto experience may look different from what is shown in this video.
Video contents
Benefits timeline (00:12)
For admins and brokers, the open enrollment sequence—setup, employee email notifications, and broker submissions to the insurance carrier
Company administrator overview (1:48)
Employee account setup for admins who want to enroll in benefits
How company administrators can enroll in benefits (2:31)
Accessing your employee profile as an admin
Employee account overview (3:00)
Signing in to Gusto to choose plans
Enroll or waive in coverage (3:21)
Verifying your personal and dependent information
Choosing or waiving coverage in Gusto
Reviewing your selections and cost summary
After open enrollment (9:51)
What to expect after open enrollment